Kind Regards,
Johan Poggenpoel, Co-Founder.
T; 012 111 0525 (Pretoria) | 010 020 6811 (Johannesburg)
E; info@poggenpoel.com
Instagram:https://www.instagram.com/poggenpoeljewel/
Facebook; www.facebook.com/poggenpoel
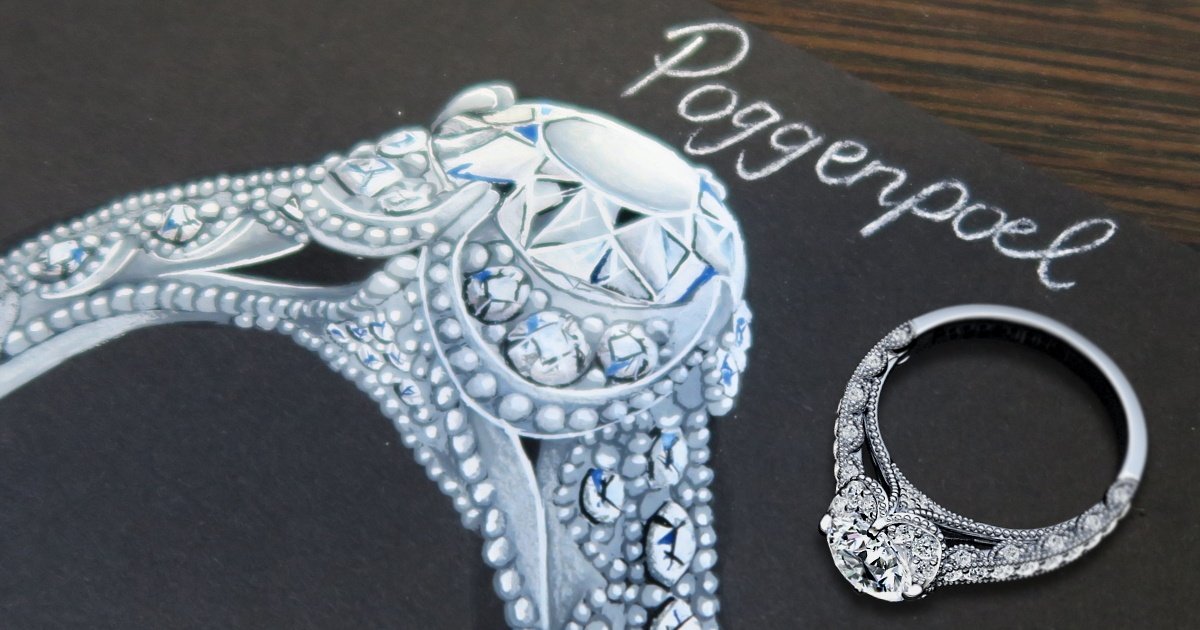
In a nutshell, we use a combination of cutting-edge technologies to ensure our designs are as fluid and neat as possible, but the final stages of manufacturing are still done by hand, working with the same tools of 50 years ago.
3D printing and computer design are indispensable in the manufacturing of high-end diamond jewellery, but they’ll only take you to a certain level. Beyond that, you’ll need brilliant artisans snuggling up with their files and polishing wheels to get your ring to perfect.
This is part 3 of a series running through the details and intricacies of our over the top process. The other two parts can be found here;
Part 1 – “Your Visit To A Poggenpoel Design Studio”; Everything you need to ensure you get the absolute most from your session at one of our studios in Rosebank and Pretoria.
Part 2; “Getting Your Design To Perfect”; a comprehensive look at all engagement ring elements to help you choose the right design for your unique journey.
This is Part 3; The transition from a 3D design, to a stunning high-end engagement ring.
To get you up to speed; at this stage of the process you’ve received your 3D engagement ring design with all the views and angles and you’ve decided to give us the green light. Good choice!
As you rest into your seat with a sigh of relief, we move into all systems go mode
#1 Your design needs to be prepared for 3D printing.
*Apple drops. Back into the constraints of gravity.
It’s great fun spinning your design around in mid-air on a computer screen, but to get that into a wax model, some support structures are needed.
3D printers start printing from the bottom of the ring, all the way up to the claws. Nothing can be suspended in mid-air, or we’re bound to have a failed print with loose wax floating around in our tray.

These structures always obstruct the “where your finger goes” part, so trying these on are generally not possible. If you would like to try on your wax design, we’ll do our best to see if we can print an additional model without all the support.
The print version of your design is then compared to the design file you approved with a checklist;
The print version of the ring is the final design that was approved. There were no further iterations of the model.
There shouldn’t be any surprise oddities on the print version. If something seems out of place, it’s worth asking the designer and consultant for approval that the notch, curve or symbol is indeed perfectly in place.
The claws need to be thick enough to ensure the diamond can be set properly.
The ring size and the dimensions of the main diamond should match with all dimensions on the original design file.
The model has all the support needed to print every last detail.
There are sufficient and adequate sprues to ensure that molten metal (during the casting process) can spread to every curve and crevice before it solidifies in a second or so.
Minimum tolerances are all checked.
If a design is too complex for a single print the digital model should be split into sections that all apply to these requirements.

The printing platform is 57mm x 32mm and fits 12 rings on average, although this takes some jewellery Tetris skills. This game takes over 10 man-hours though…
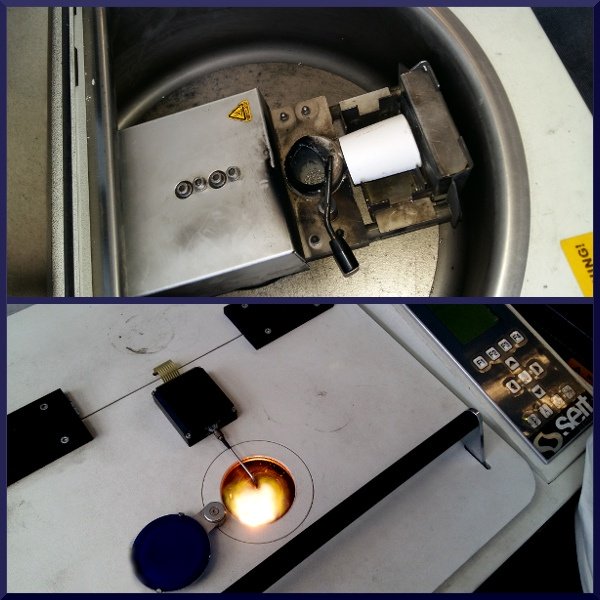
#2 From digital to wax (3D printing)
To ensure every last detail is crisply printed with no distortion or digital artifacts, the printer is finely recalibrated with every third print.
Once we’re sure the calibration is 100% we push the play button to start the wax printer.
Fact; the 3D printer takes 5 hours to print a resolution of 25 microns per layer to ensure ultimate precision and detail.
The newly printed wax models are flexible and very slightly sticky just after printing. They’re washed in pure ethanol and then cured in an UV-Oven. This lightbox dries out the models, makes them harder and crispens up the resolution.
If we see a hint of an imperfection, the model is checked and we reprint a new one.

#3 Making a gypsum mold for casting.
We’re often asked if folks can have their wax models after manufacturing. There is a little problem with that…
That wax model, that was directly printed from your approved design, evaporates in the process of creating a precision gypsum mold.
First of all, we sort the models according to the metal they should be cast in; platinum, palladium and 18k gold. Then they’re bundled in pairs and set into the base of a silicone cylinder using a softer wax as “glue”.
Next, we place the cylindrical silicone tube in/around this base to create a little tub of joy for us to pour gypsum into.

We use a dental gypsum we import from Italy. The dental industry uses a very similar process to the jewellery industry when creating crowns or grills. The powder is considerably more expensive than popular jewellery solutions, but we’re very pleased with the level of detail. It’s worthless to have a 3D printer with an extremely high resolution if the detail and precision can’t be carried through the rest of the process.
The gypsum is cooked up in small batches (per cylinder), and the liquid mixture is immediately placed in a vacuum chamber. After a minute under vacuum the mixture is poured into the cylinder, and once again placed under full vacuum. Why do we need a vacuum chamber? You want every last drop of gypsum “sucked” into place, making that crisp mold we’ve been chasing. It perfectly compresses and compacts when the air has been removed.
After the second vacuum, the mold is set aside and hardens in about 5 minutes. After all the molds are done they’re placed into the furnace overnight (at over 1000’C) to bake the gypsum to a ceramic type state. This level of heat literally evaporates the wax model, leaving a perfect negative space where we’ll be casting your choice of metal into.
Happy burning oven, I’ll see you in the morning.

#4 Casting your choice of metal into the mold.
Flasks are all marked with a code indicating the choice of metal, and the quantity of metal needed for the cast. The amount metal needed to fill the spaces and support structure is often more than the metal weight of the ring itself.
The casting process differs significantly between the metal choices. Each metal has a unique sequence of very specific actions within tight parameters. If you’re imagining just heating some metal in an urn with a torch – that’s how you mess it up. To properly heat and melt the metal homogeneously we use electromagnetic induction (magnets).
*Palladium is the most difficult to cast perfectly with a long shot. The level of difficulty uses results in manufacturers abandoning palladium altogether. We visited jewellers in the US on two trips to learn the delicate process.

First of all the batch of metal is preheated to casting temperature to ensure it’s behaving as it should. If it gets all wild and boiling the metal mixture is off and needs to be remade from scratch.
If the metal is A-OK, the gypsum mold is placed into the casting machine, ensuring the mold’s opening aligns with the sprout of the casting machine’s crucible.
Some elements and functions used in the casting process; (in no specific order)
A powerful vacuum pump is used to extract all air from the casting chamber. This reduces the porosity of all palladium alloys significantly.
Argon gas is used to smother all oxygen particles in the chamber. All molten palladium alloys have an adverse reaction to any air that contains an even trace amount of oxygen. A typical sequence would be to extract all air, then fill the chamber with argon, and then once again extracting the air under vacuum.
During the casting, process overpressure can be applied by flooding the vacuumed chamber with filtered air or argon gas. This pressure pushes the molten metal further into the mold.
Centrifugal force is used to spin the molten metal out of the crucible and into the mold with great force.
After a casting session, the molds are left to cool down to room temperature. Submerging an 800’C gypsum mold into cold water can weaken and crack the metal.
Hammertime! We very delicately (?) bash open these flasks with a pointed hammer.

You’ve seen our hatchings right? Check them out here…
This should remove around 80% of the gypsum, but with the mold close to fusing with the molten alloy during the cast we employ magnetic tumblers, sharp pliers and a liquid de-investment agent that dissolves all binders and breaks down all gypsum.
Quality Control
Metal Fill Check Fill; did the metal fill the whole mold completely? If there are filling issues the model would have to be reprinted with extra sprues to guide and assist metal flow better next time around.
Metal Quality Check; is the metal dense, smooth and free of any visible porosity? Minor porosity is unavoidable, but we set the bar quite high here. The quality of our castings is very evident when you compare it to that of most other manufacturing jewellers.
Your casted model is now distributed to your personal consultant/representative, where they do one final check of the piece to ensure it’s on par with all notes and discussions throughout the design process.
Your job card is made up including your main diamond, printed designs, and all notes and detail the goldsmith should have at hand.
#5 Off to your designated goldsmith.
Exactly as with the selection of the right designer, certain goldsmiths excel at specific areas and design styles. Your consultant will choose the best goldsmith for the job and run them through every little dot and dash on the job card.
This perfect matching of competencies to the job at hand really shows when seeing the variety of styles that are flawlessly finished in our studio. We’re fluent in dozens of engagement ring styles.
Firstly, the support sprues are carefully sawed and filed off. Your goldsmith keeps your design at hand to ensure not a sliver of the actual ring is removed.
Do you know the tale where Michelangelo was asked how he managed to carve the awe-inspiring David from marble? He answered that you just carve away everything that doesn’t look like David.
Kind of the same story here…
Once all the extras are removed your ring is due for its first round of finishing. This includes ultrafine filing work, meticulous drilling and a multi-step process of polishing wheels dressed with a variety of waxes.

This can easily take a few hours for simple designs and a day for more complex pieces.
Your ring is then placed into your job card and returned to your consultant.
*As of November 2017, we have 11 goldsmiths in 2 factories finishing off our castings.
#6 Selection of small diamonds and setting.
We’re obsessed and meticulous when it comes to choosing the right small diamonds to use in your ring where needed.
A diamond setter hand fits a variety of 40 small diamond sizes into the ring to ensure it’s the correct size.
Once he is satisfied he’ll jot down a detailed note on what quantity, size and quality small diamonds he needs.
The consultant then neatly places your center diamond into a crisp white “boat”, and the small diamonds are perfectly color matched to it one by one.
There’s no wiggle room here. They need to be perfect;
If the small diamonds are whiter than your center diamond the contrast will make the main diamond seem more tinted in color.
If the small diamonds are too colored the eye picks it up very quickly, and it’s going to bug you. Believe me.
Your setter carefully places the diamonds into their seats, and the metal prongs are closed around them to ensure a snug fit.
After the diamond are adequately secured your setter will file away any excess metal on the prongs/claws to ensure optimal exposure of your small diamonds, without poor durability.

This craft takes years and years to master. Not a single diamond can be set 0,001% skew or lower than the rest. The quality of the set work can make or break your engagement ring.
#7 Final Finishing.
The diamond setting process takes its toll on a jewellery piece.
The ring is a vision in place, and then metal tools are used for the closing/bending of the prongs. A tar-like substance is also used to keep the diamonds in place temporarily, and occasionally the dark residue gets trapped under a set diamond, compromising its brilliance and color.
The tiny scratches collected at the setting station can be polished out relatively quickly, and that tarnish substance dissolves in a methylated spirits bath.
Further, the diamond prongs are filed round to ensure that they won’t easily catch onto a thread, and be pulled out of place. Engagement rings are far from indestructible, and I encourage you to read our quick guide on lifestyles considerations focussing on wear and tear (link).
Your ring is then taken through a 2 step buffing process to ensure the metal surface is as smooth as can be, and there are no rough patches of metalwork anywhere in sight.

*String buffs (looks like floss) are used to polish areas that can’t be reached by a polishing wheel. The strings are especially useful for obtaining a uniform sheen on vintage engagement rings.
One. Last. Stop.
#8 Final Quality Control.
We promised perfection, and it’s time to ensure we deliver just that.
Our workshop manager, Ryan, is in charge of the final quality check. He’s of opinion that 99% right is 100% wrong. That’s why we picked him.
Let’s torture your ring…
Your complete and polished ring is placed in an ultrasonic bath for an hour that vibrates the ring at 42 000 Hz. Any hidden residue will dislodge… but so will diamonds that haven’t been properly set. This emulates months of normal wear.
Ryan focuses on these key issues;
All diamonds in the ring must be perfectly aligned and symmetrical on every axis.
The ring should be perfectly round.
The polishing should be uniform without any rough patches.
The diamond prongs/claws are checked to see if they’re all making contact with the diamond they’re guarding.
The finished product is finally inspected by Kobus Poggenpoel, and signed off to your consultant that will eagerly send you a note that the work is done.
You’re going to love the ring.
I really want to make your ring. Here’s the how and why…
This manufacturing process and it’s inherent attention to detail is over the top.
BUT that’s the level of craftsmanship we’re after, and exactly what you should be looking for.
Hopefully this is your first and last time buying an engagement ring, and I encourage you to put in the effort to make it extra special.
I know we can give you more than just the best value, you’ll receive a jewellery piece that can stand on its own in any company. Something you can be proud of for decades.
I’m here to help. For any questions or queries feel free to reach out on info@poggenpoel.com, or give us a call on 012 111 0525 (Pretoria) or 010 020 6811 (Rosebank).
Take care. And please let me know if you enjoyed the blog!

Kind Regards,
Johan Poggenpoel, Co-Founder.
T; 012 111 0525 (Pretoria) | 010 020 6811 (Johannesburg)
E; info@poggenpoel.com
Instagram:https://www.instagram.com/poggenpoeljewel/
Facebook; www.facebook.com/poggenpoel
You’re more than welcome to reach out on info@poggenpoel.com with any questions and comments.